Showing posts with label Gender Neutral Gifts. Show all posts

Tuesday, May 5, 2015

In the Jungle...

I can't believe it's been over a year since posting a blog about the creation of one of my diaper cakes. Time gets away from us so fast! I'm going to try to get caught up again on my blog posts and give my awesome fans some more behind the scenes looks at my creations.

I was thrilled when I received a request for a Lion King set. There are so many adorable Lion King baby items and some great possibilities when it comes to accents that when I received the order request, I instantly started having ideas. I was even more excited that this order was the largest one to date. My customer not only wanted a large 4-tier cake, but she also wanted a coordinating buggy. I was pumped!

One of the pitfalls to doing licensed items on baby gifts is balancing costs. While these themes are so fun to work with, the costs can add up quickly. Like the previous LSU cake I had done, I had to consider the budget I was working with and make sure to include enough accents to ensure a uniform and identifiable theme while keeping costs down with coordinating, but not necessarily licensed baby items.

For this cake, I opted to create a more neutral base that was reminiscent of the Lion King baby items that were widely available. I kept with browns and greens and used these awesome blankets that had leaf patterns on them. They worked great with the leaf accents seen so frequently on Lion King paraphernalia. I also incorporated some giraffe ribbon which again was a common print seen with Lion King baby products.

Of course, I included plenty of Lion King officially licensed goodies including teethers, pacifiers, a soft book, and of course an adorable plush Simba for the cake topper. I also included a few additional washcloths, just to match the colors.

As final accents for the cake, I added some additional Lion King badges and leaf die cuts.

For the buggy which was made to coordinate, I used a matching blanket and the same ribbons I used on the cake. I included color coordinated washcloths as well. My favorite part was an adorable Simba lovey, that when positioned just right, made it look as though Simba was tucked into the buggy. I loved the effect it had! I also finished the buggy off with the same Simba badges and leaf die cuts so the two pieces were a complete unit.

Just like all my other gifts, this set became my new favorite. I love the opportunity to make the larger cakes because there is so much to work with. This cake had tons of items and visual appeal without going overboard and costing a fortune. My customer loved it, which is, as always, the best part of what I do.


Friday, October 4, 2013

Unique Diaper Gift for the Mom with Everything

I was contacted by an individual requesting a unique gift for a third time mom. The expectant mom pretty much had everything she needed for a new baby, but my customer was looking for something diaper cake related and small. More importantly, she was looking for something unique. She mentioned that the mom was doing a jungle sort of theme.

This discussion sparked me with some inspiration, so while my potential customer was looking over some various buggies I had available, I grabbed some items I had in stock and put together a unique gift that I had been wanting to try out. I figured I'd offer it to her and if she didn't want it, it was no big deal and I'd be happy to get her the buggy of her choice.

Inspired by some other projects I had seen I wanted to make a jungle tree with a monkey. I used diapers on the base for a portion of the structure and wrapped it up in a brown blanket. Additional diapers and a leaf printed blanket created the canopy for the tree. I added a few washcloth flowers at the base of the tree to give a few additional baby items. The top of the tree also included a washcloth.

I presented the picture to my customer and let her know my final vision included a plush monkey. If she liked this idea, I'd order the monkey and she'd have a truly unique gift.

Well, she absolutely loved the tree and it provided several baby items in a smaller gift than a large diaper cake. I ordered the monkey and added to the tree for the final gift. If we are looking at it realistically, the monkey is a bit big, the trunk a bit wide, but the general idea is there and it's still adorable. I would love the opportunity to create another similar gift in the future. I'd likely make a few tweaks to make the trunk narrower and taller, but otherwise, I think it's a fantastically adorable concept! I love opportunities like this that stretch my creativity!

Tuesday, June 11, 2013

Building an Ark

A friend of mine was helping to plan a baby shower at work. He was gracious enough to share my business with his colleagues and they loved my work and were interested in a small diaper gift. They wanted a buggy with a Noah's Ark theme. Easy enough, right? Not so much...

The basic buggy has a blanket, some wash cloths, a burp cloth and may or may not include additional baby items. As popular as Noah's Ark is as far as baby items go, I have never seen receiving blankets or washcloths patterned as such. I decided I'd look for some Noah's Ark printed ribbon I'd seen in the past an maybe add some toy animals to the buggy. Apparently, the ribbon is popular because I checked several stores and online and the few sources that carried it were out if stock. Back to the drawing board.

As I continue to think what I could do, I contemplated adding ark and animal die cuts to a buggy when I was struck with an idea. Why not build an ark? Sure, it sounds crazy, but it had the potential to be really cute. I decided to take the chance and make one. If my friend didn't like it, I could just go back to the buggy idea.

First, I had to get the basic shape which I built up with diapers. It took a couple tries, but with a tan blanket strategically folded around it, the ark was coming together and looking rather boat-like. I added a few details such as a roof and I had ordered some toy animals, in pairs of course, to add to the ark.


The final ark was so adorable and my friend loved it (as did his co-workers). If I make another, there may be some additional tweaks, or added baby items. We'll see. I'm just glad I had the opportunity to try something a little different and see what could develop!

Tuesday, March 12, 2013

Monkey Trike!

You would not believe how excited I was to get my first order for a trike. I had made a few prior to this request and I was armed and ready with new ideas and techniques. What can I say, after making a few, there was definite room for improvement and that's exactly what I intended to do, improve.

The request for this trike was for a monkey theme which worked out wonderfully since monkeys are very popular on baby items and once we decided on the color green, I knew just which blankets to order for this trike. I built this one up slightly different than the ones I had done in the past. This one had the back wheels positioned outside of the front wheel rather than just behind. This gave the trike more stability and made it look more like a trike in pictures. I used several baby items to build it up including blankets, washcloths, a burp cloth, and bottle; and of course, the monkey driver. Finished off with ribbons, this gift was done.

I am so proud of how this one turned out and I learned some new tricks along the way. These trikes are so fun to make and I can't wait for another opportunity. My customer loved it, of course, and I now have one more awesome gift to brag about.

Sunday, December 2, 2012

Crochet for the Holidays

One of my customers of my boob beanies showed me a picture of an adorable newborn pirate hat that she had seen and wondered if I could make something like it. She wanted it for Halloween for her 7 week old. I told her that I probably could if I had a pattern. I didn't concretely say that I would do it - I didn't want to make a promise I couldn't keep. I went in search of a pattern, because really, who can resist and adorable baby dressed up as a pirate?

I collected a couple patterns, including the one from the picture she showed me. I went to work using the pattern from the picture and decided I'd use the other one as a back-up depending on how the first turned out. Sadly, I didn't have the materials I needed. I didn't have the right yarn or the right crochet hook. Being me, I just made-do with what I had and decided I'd see how it came out and fix any problems I encountered as I encountered them. And I did encounter them. The first hat I made was adorable. And tiny. Really tiny. It figures considering my crochet hook was too small. And my yarn too narrow. Fair enough, I decided I'd adjust the pattern and make it larger - which came with it's own set of challenges. This worked well and the hat came out adorable, and after fiddling with and altering the pattern for the Jolly Roger logo, I had a super cute hat. For a tiny baby. Like, newborn tiny. Maybe preemie. Or a doll. I thought it might fit since my boys were able to wear some newborn items until they were about 8 weeks old. Not the case here. Once again, I adjusted the pattern and enlarged it (again, with more challenges) and completed a super cute pirate hat that was much more suited for a 0-3 mo baby. I pushed it a bit close to Halloween, but my customer had it in time and all worked out well.

Inspired by the pirate hat, I decided to create an adorable pumpkin hat too. I had saved the pattern quite some time ago, like over a year. I decided I couldn't keep staring at it hoping for a reason to make it, so I just made it. Fortunately, I didn't have to alter the pattern much for this one and managed to get it right the first time. So super cute! This particular pattern lends itself to extending quite well, so adjusting for larger sizes is much easier than with the pirate hat.


I'm so excited about these adorable additions to my repertoire. I'm looking forward to more for future holidays. Now to find some winter patterns!

Friday, November 18, 2011

Prepping for the Craft Fair

After finishing up my harvest diaper cake (and another order which will be written about after the shower in a couple of weeks), I needed to get to work preparing for the annual craft fair I do with my mom. This year would be my second year bringing my baby gifts to the show. I actually had some inventory left from last year, but I had sold a buggy at the show last year. I also sold one of my gender neutral cakes sometime in the middle of the year that I had in inventory from the show. I dismantled two cakes I had made for last years show to use some of the baby items for another cake. All those items needed to be replaced so that I would have enough at the craft fair.

The first cake I worked on was 2-tier girl cake. I was super excited about this cake. Ever since I saw the blankets I used for it, I knew exactly what I wanted to do. This cake, the "Cupcake Cake" features a cupcake printed receiving blanket, plus another coordinating blanket. The lower tier is lined with washcloth cupcakes. The topper for the cake is a large cupcake made with a onsie and a washcloth. All the cupcakes are topped with red pom pom cherries for effect.

The second cake I made for the show was a 3-tier girl cake, a butterfly cake. For this cake, I used two butterfly print receiving blankets and a coordinating green blanket with dots. To embellish this cake, I added washcloth butterflies and flowers. I also added pink flower shaped teethers to decorate. This cake incorporates a kind of washcloth flower I had never done before and I love the final look. While not in the pictures, I did at antennas to the butterflies before wrapping the cake for sale.

The third new item I made for the craft fair was a 2-tier gender neutral cake. This cake featured a duck patterned blanket, plus another coordinating blanket around the tiers. Added to this cake was a matched duck hat and mitten set. I also added a washcloth, some baby bath samples, and water filled teethers.

The final new item I made for the craft fair was a buggy. This buggy needed to be a boy buggy. I selected a car print receiving blanket for the main buggy basket. I added coordinating washcloths for the buggy hood and the "blanket" inside the buggy.


Along with these new creations and the other baby items I had in inventory, I was ready for the show. I had high hopes of improving on last year's sales. There has been a definite progression of my work over the past year and I was proud of many of the new cakes I had to offer. In my next blog post, I'll give an update on the show including pics, so make sure to check back!

Wednesday, November 16, 2011

Ready for the Harvest!

I recently completed perhaps my most time consuming cake and I would do it again in a heartbeat because it was so much fun! This cake presented a particular challenge as it was to be diaper free. The cake was for a friend of mine. The mom group that I belong to was planning a shower for one of the moms in the group. We decided on a fall/harvest theme for the shower. I, of course, volunteered to provide the diaper cake which would also be my gift to the expectant mom.

Here is where the challenge came in: the mom is a cloth diapering mom but already had a HUGE diaper stash and didn't need any more. So, it was to be a diaper-free diaper cake. Or just a baby cake, I suppose. Not to worry. I decided that this was an easy enough hurdle to jump. Towel cakes are becoming increasingly popular for wedding gifts so, why not do the same with blankets? I usually use receiving blankets for my diaper cakes anyway and the mom had requested receiving blankets since she didn't have the ones from her last baby anymore. I was all set and ready to make a Blanket Cake! This was easier said than done.

6 blanket cake, first attempt
I collected 6 blankets in various boy patterns (since the mom was expecting a boy) and proceeded to start construction on the cake. I was all set to cover the cake completely in ribbon  to match the theme so the pattern of the blankets really didn't make much difference in regards to the final product. As I began to build the cake, I noticed one big glaring problem. The size. It turns out that since flannel isn't a particularly thick fabric, when relied on entirely to build a cake, it is quite lacking. I put the ribbon on the see how it would all work and the result was less than awe-inspiring. Tiny cake (even smaller than my mini 2-tier holiday cakes), the white crinkle paper looked completely out of place, and there were issues with the ribbon (but that was easily remedied). It was back to the drawing board.

3-tier, 10 blankets, final cake
I had intended a 3-tier cake, but as it was, that would never work. So, in the end, I picked up some bath toys that were in a cylindrical container. That container acted as my core for the cake and I started to build again. With the addition of four more coordinating blankets, the cake, though smaller in diameter to most of my other 3-tier cakes, was much more impressive. New ribbon encircled the cake, coordinating paper shred was added, artificial fall leaves were arranged around the cake board, and then it was on to the final touches.

First pumpkin attempt
The final touches were a whole new ball game. And I mean new. New project for me, new to my diaper cakes. Just new. I decided to maintain the theme, I'd crochet a collection of stuffed squashes and gourds to decorate the cake. After the shower, they could be used by the expectant mom's kids as play food. I'd never crocheted food before so it was entirely new territory for me. Luckily, I had crocheted before (my mom taught me, several times) so I knew how to do the stitches and read a pattern. Armed with my crochet hook, cotton thread, patterns (which were difficult enough to find - or make up as the case turned out to be fore some of them), and the phone to call my mom for help in case of difficulties, I was ready to go. The first project was a pumpkin for the topper. While the pumpkin turned out great, it was entirely too bright and too big for the cake, so I remade it with a smaller hook and different colored yarn. I then moved on to the other gourds and squashes. I followed patterns for some, and others I just made up based on how I knew I wanted them to look. They turned out great. I added them to the cake and wallah! I was done.
Gourd set (including 1st pumpkin)

The final cake was such a work of art. it became my new favorite cake and I was so proud of how it turned out. There were so many new techniques that went in to building this cake and I couldn't have been happier with it. The cake looked fantastic with the rest of the shower decorations and their fall/harvest theme. The best part is that the mom loved it.

Finished cake as presented to the mom
I now can add a few new products to my product line - non-diaper baby cakes and crocheted stuffed toys. We'll see how similar projects turn out, but so far, it's going well.

Friday, October 28, 2011

Halloween Cake!

Starting last December I began making holiday cakes. They are mostly for display and to show what is possible. No matter the theme of your shower, a cake can almost assuredly be made to match. Of course, if you are going to be welcoming a baby the same month as a major holiday, that can always be the theme of a shower. Or a cake like this can be a holiday gift for a baby that is celebrating his or her first one. In any case, I couldn't skip Halloween as it is one of my favorite holidays, so here it is, my Halloween display cake.

In true form, similar to several of my other holiday cakes, this mini cake was a 2-tiered cake. I cheated a little when I built it, because I didn't actually use baby items to cover the tiers. I simply used cotton flannel fabric. Since this cake was for display purposes only, I didn't go through the trouble of making actual burp cloths, but in the event that someone wanted to order a similar cake, that is most likely what I'd do. Holiday apparel seems readily available, however, other baby items like burp cloths and blankets are not seen as frequently with holiday themes. Luckily, they can be made if the occasion calls (and you happen to be crafty enough, which, fortunately, I am). I kept it very simple with this one with the accents. I used some adorable candy corn ribbon for the tiers. I also added some white wash cloths, a pair of orange baby spoons, and finished it off with matching Jack-o-lantern hat and socks. I added some tissue paper to decorate and separate the tiers, but I'm not sure I would employ this method frequently since that would be the only part of the cake I'm a bit unsure about.

I really like how this cake turned out and I'm excited about future possibilities with this theme. I was tempted to make a couple different Halloween cakes, but I restrained myself. I look forward to more cakes where I can test my creativity. The seasonal ones are especially fun. I already have my next one ready to go! Keep checking back to see what I've come up with!

Monday, October 3, 2011

Sundae, Sundae, Sundae...

Once again, I've taken inspiration from others and I've created another small item for my product line. I've thought about making these for a while, but never got around to it until now. So, now introducing, the Sundae.

These cute little items are pretty basic. They are made with washcloths and baby bowls and utensils. It's a great little way to add flair to a shower and have your decorations be more than just decorative. Little items like this are great gifts for expectant moms because they are items she is sure to be able to use.

Sundaes are available in a wide combination of colors and can be made for girls, boys, or babies of unknown gender. I think they are cute and simple. I look forward to providing these for showers in the future!

Saturday, October 1, 2011

At Project's End

I finally finished the shoes I have been working on. After difficulty figuring out the pattern and sizing, I achieved the correct size, as you know from my previous post. I completed the shoes in the requested material. These shoes were no ordinary shoes though.

Toddler shoes 6.5"
First pair of denim shoes I made
Aside from the smaller size which presents it's own challenges, the mom wanted the shoes made using denim. I had made another pair of shoes for this mom for her toddler also in denim (she wanted matching shoes for her boys). You may have seen the picture of the larger pair I made. The thing I failed to mention about these shoes was the sheer difficulty of using denim. The canvas that I typically use for the top of the shoes is pretty thick in it's own right, however, the top of the shoe isn't typically manipulated a lot. The heel portion, however, is much more difficult to manage. When using twill which is my regular material for the heel portion of the shoe, I have enough difficulty as 12 or so layers of material is a challenge for sewing machines, especially without the right needle (which needs to be super sharp and strong) or a top quality motor (otherwise I would have burned mine out a long time ago). The denim, however, it thicker than the canvas and probably should have killed my machine. Luckily, it didn't. I completed the shoes and they came out the same size as the practice shoes, which was great.

Baby shoes 4.25"
I did discover a potential problem, however. Because of the thickness of the material, the elastic casing is especially thick. A the ends where the material is stitched, folded over and stitched again (several times) it is so thick it actually narrows the amount of space on the inside if the shoe. The shoes then, became much more ideal for narrow or flat feet and they were actually difficult to try on my youngest who is about the same age as the baby that will be wearing the shoes. I do hope they work out though. I really want the mom to get what she wanted.

I have come to a conclusion, though. As much as it may upset some potential customers, I simply cannot make denim shoes again. The fact that I didn't burn out my sewing machine motor is a complete surprise to me. Denim really is too thick for the shoes. I do try to meet my customers' requests, but in this case, the mom benefitted from being a friend and my naïveté at how unsuitable denim is for this project. At least I know now and with continued experience in making these shoes, they are getting better and more consistent and I'm learning the nuances involved in their production.

Sunday, September 11, 2011

Oh, no. What did I do?

So a current order of mine is for a pair of baby shoes. The shoes are for a (now) 4 mo. old baby. It's the first time I had to go smaller on my pattern so it was quite an adventure.

At first, I was a little bit hesitant to make shoes for a baby. After all, what does a baby really need shoes for? As they don't walk, shoes don't really serve much of a purpose other than keeping feet warm. In my mind socks can serve that function. Although, recently, I've come to a new conclusion. I recall that many moms are bothered by the lack of ability baby socks have to actually stay on the baby's foot. I have experienced this myself. I've heard several people say they've put shoes on their babies solely to keep the sock on. Here's the way I see it now: if a shoe is required to keep a sock on, at least it can be a soft flexible shoe that will not constrict growth or movement. This function is served well by my soft-soled shoes and therefore, there is a rationale to make them that I can live with. Call me strange, but keeping with my ideals with the products I make plays into maintaining my integrity. But I digress.

In any case, I set out to rework my pattern, this time for a smaller foot. What I developed should have been a shoe that measured 4 in. to fit a baby with a 3.5 in. foot. I measured everything out and very carefully drew out my pattern to maintain the exact size differences that previous patterns had given me. When sewing the shoes I was diligent (as I usually am) about maintaining consistency in my seams, etc. When all was said and done, I had created just about the cutest little shoes I had ever seen. Then I measured them. Yeah, they were 1/2 in. too short. I have no idea how that happened. That's not a small amount when we are talking itty bitty baby shoes.


So, it was back to the drawing board. I used some (more) scrap fabric and leather to make another pair of shoes just to check sizing before I made the final pair for my order. The second pair came out the way they were supposed to. Kinda. The larger pattern I used was supposed to make a 4.5 in. shoe (even though it was the "next size up" from the other one). The shoe turned out to be 4.25 in. I'd throw in the towel, but these shoes fit my little one who is close in age to the baby who will wear the shoes so I figure with the time that has gone by and the fact that babies grow, the shoes should fit. I'm going to make the pair the mom requested (with the fabric she requested), cross my fingers, and hope for the best.

Friday, September 2, 2011

Now Available: Burp Cloths!

With my new-found "joy" of sewing, I got inspired to make some more items other than the shoes and taggy blocks to add to my product line. I wanted to make some burp cloths. At first, I was considering embellishing prefold diapers (and still may at some point), but I decided to make the whole thing (or things) from scratch. I opted to make them in the same style as prefold diapers but sew them completely on my own as well as add embellishments.

My first go at making the burp cloths was not nearly as easy as I thought it would be, but they did actually come out beautifully. I chose cotton flannel material since I had seen several commercial burp cloths made from flannel and it's a nice soft baby friendly material - especially after washing. My first selection was an adorable jungle/safari flannel material that I had used for some taggy blocks. Jungle/safari themes are so popular for babies today that even if it doesn't match a nursery set perfectly, it can still coordinate. I opted to offer the burp cloths in pairs of coordinating cloths. This first pair includes a solid jungle/safari material burp cloth and a green burp cloth with the jungle/safari accent. The project was certainly a test to my sewing ability; however, I truly think I proved how my skills have improved over the years.

My next step was "packaging" for sale and deciding how I wanted them to look. I opted for securing them with a simple ribbon and attaching a tag. The last thing a recipient wants is a lot of material to deal with and packaging with less waste is easier for everyone. I am so excited to add more designs and currently have materials for at least three more pairs of burp cloths. I hope potential customers love them as much as I do!

Wednesday, August 31, 2011

Taggy Blocks!

About a year ago, I was at a gathering with some moms I know for us to work on various sewing projects. Each of us was supposed to be working on our own thing, but for some reason, I felt really uninspired. I had some different materials that I had brought with me, but I just couldn't think of anything to make. One of the moms was working on some fabric blocks for her little girl. With nothing else to do and only enough time left in our little gathering for a smaller project. I decided that I would make a block for my little one too.

I pulled out some Dallas Cowboys material that I had brought with me and cut out the squares and got to sewing. I used some ribbon that one of the moms had with her to create some tags on a few of the block edges. At first, the block came together pretty easily, but putting it all together was not entirely as simple as I anticipated. With some more "borrowed" materials, I stuffed and finished the block and even added some plastic bags for a crinkle effect. My kiddo really enjoyed the block and still does to this day. I loved the concept of the taggy block and thought I might want to make them for my boutique down the road sometime.

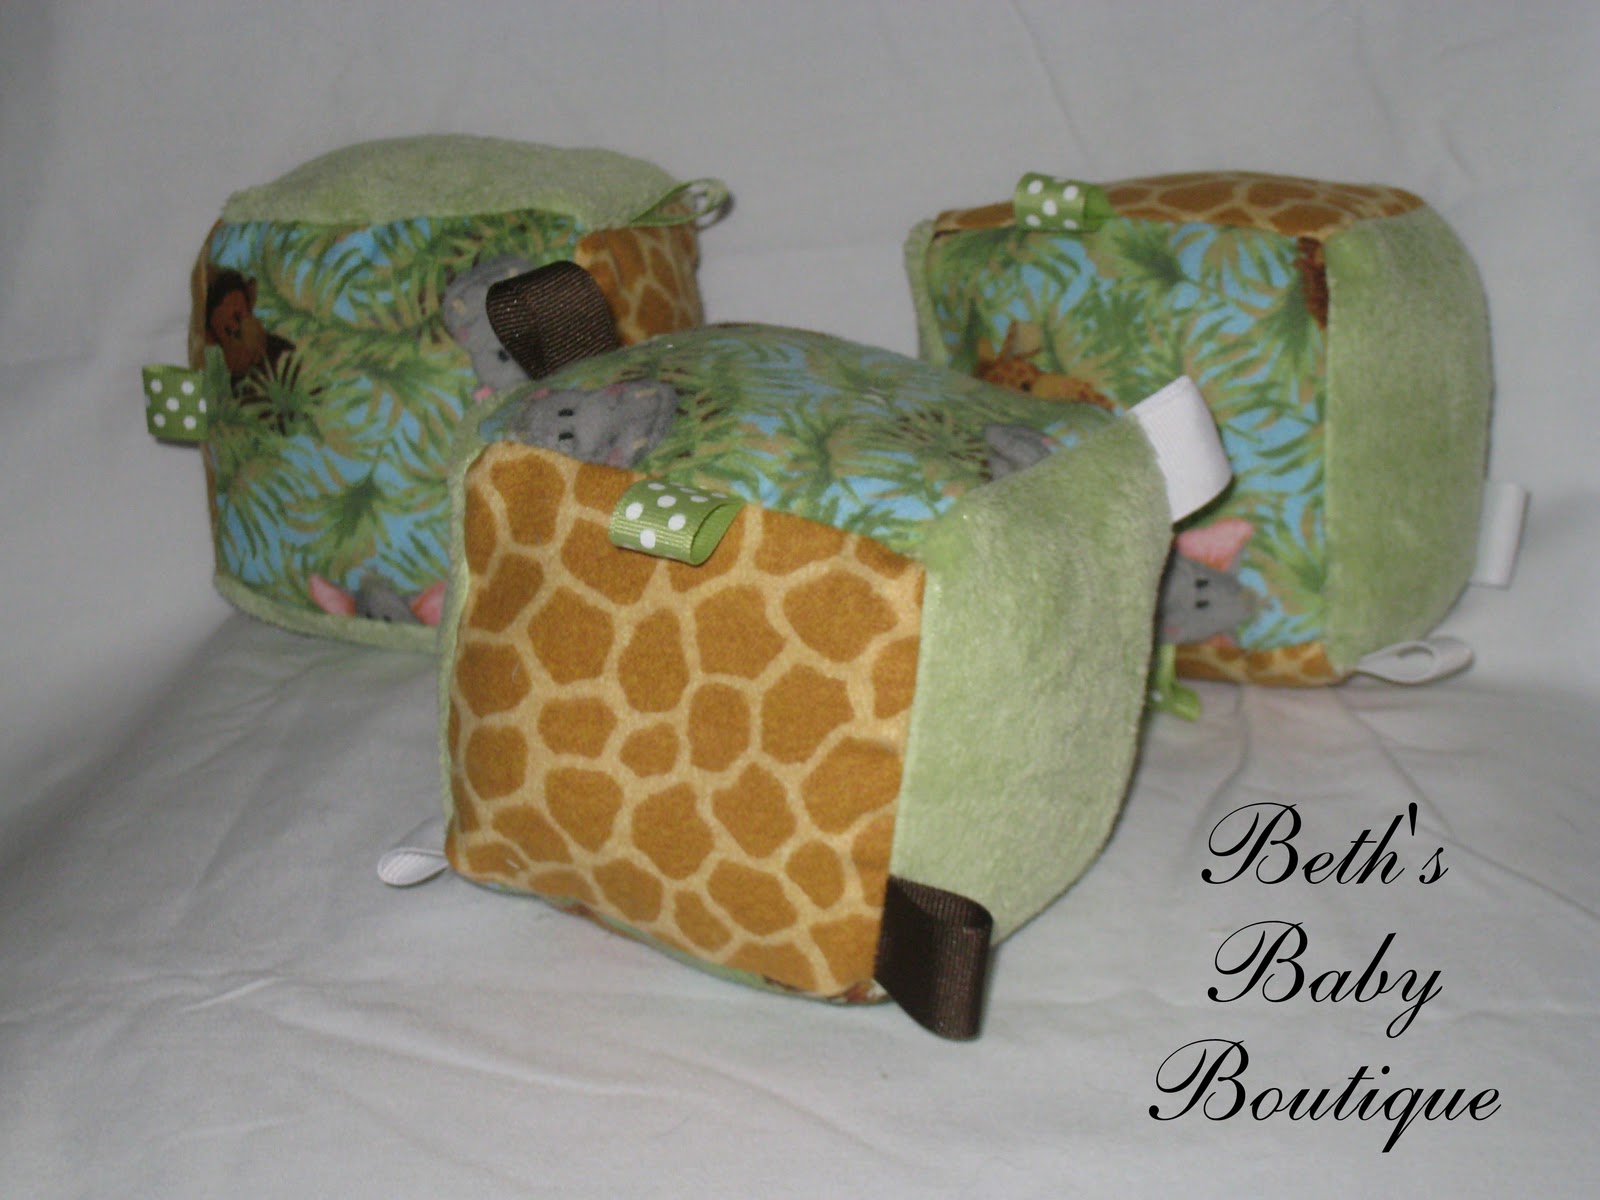
Apparently, "down the road" was pretty far down the road. I decided recently that I was ready to try again. I picked up some different materials for the blocks I was planning. I found some adorable nursery flannel in a jungle/safari print. I found two prints that coordinated and then picked out some super soft minky. Added ribbon would help complete the block with tags. I made up a set of three matching blocks. Two of the blocks included crinkle sounds and the third block includes a rattle.

I love the final result. Each of the blocks includes various traits for sensory development in babies and toddlers, not to mention providing a good, simple, safe toy. If I have one complaint about the blocks, it's that they are not washable aside from spot cleaning the surface. I can make the blocks without the crinkle or rattle to allow for machine washing and drying, but that would remove attributes that make them really unique. I have extra materials ready to go for additional sets of blocks which I'm really excited about. I hope I have the opportunity to get them made up soon. =)

Friday, August 12, 2011

Hats Off to Breastfeeding... Or is That "On"?

Recently some friends of mine and I were participating in The Big Latch On, an event sponsored by La Leche League to promote breastfeeding awareness. The event was scheduled on August 6th the Saturday of  Breastfeeding Awareness Week which is always the first week of August which is also considered National Breastfeeding Month. After the event (an effort to collect as many moms as possible to simultaneously nurse their little ones around the world), we were chatting about the boob beanies that are available for babies. The idea of these little hats are to promote breastfeeding in a non-conventional way by normalizing the sight of a breast. Theoretically, a baby/child would wear this hat that resembles a breast while nursing. Depending on your sense of humor, you'd find it funny or amusing. To some, it might be offensive - likely, those are the people that are not a fan of nursing in public or perhaps breastfeeding in general. One mom mentioned that at one time she had one of those hats but that she had shared it with another mom and was likely not to see it again. Another mom mentioned that she wanted one. I suggested they make them (since we recently attended a crochet class led by none other than my own mom). Sadly, neither mom felt they possessed the skill to make the hat. To which I foolishly responded, "I could probably make one." Me and my big mouth...

My own crochet skill, I felt left much to be desired. I learned the craft when I was a child and would crochet clothing for my dolls. As I got older, I made a bag and several adult sized beanie hats. I used one stitch and didn't get more complicated than that. I hosted crochet classes taught by my mom twice - one about a year ago and one a few months ago. After the second class, I really was starting to understand the basics (which I wasn't patient enough to pay attention to when I was younger and not disciplined enough to practice after the class a year ago). I also became more intrigued by the items that can be made and began perusing patterns. It was actually having a project that got me to practice more and see what I could create.

I found a pattern for the boob beanie and collected my materials - cotton baby soft yarn in the appropriate colors. It certainly was an interesting experiment. While working on the hat, I ripped it out three times because I couldn't get it right. It was rather frustrating. It certainly didn't help that I wanted to change which stitch was used on part of the hat. In the end though, I finished it. I do love how it came out. I found it to be simply adorable.

The pattern labels the hat "newborn" size. It fits my 3 mo old whom I used to model the hat so people can see how it looks on a baby. I look forward to recreating the hat in various color combinations and expanding the sizes that I can make, but for now, it's only available in the one size. I can't wait to see where this takes me!

Friday, June 17, 2011

Sweeeeeeeeeeeeeeeeeeeeeet!

Here I go again, recreating things I've done. While most my previous recreations are adapting things to a smaller size, I now have up-sized. Biggie sized. Super sized. And we are done with the fast food references... This time, it's the cupcakes that get the attention.

At the beginning of this year, I decided to add baby cupcakes to my product line introducing a cute little way to present washcloths and other baby items. To get the right effect, the baby gift needs to be presented in a cupcake wrapper. The first ones I did were great and with a little tweaking, I figured out how I wanted them to look. The regular sized wrappers presented a bit of a problem though. Their size limited what baby items could be used. For a bigger or bulkier item, a larger cake wrapper would be needed.

Introducing, the Large Cupcake. With the assistance of a larger cupcake wrapper, I was able to create a cupcake with a baby bodysuit and a coordinating washcloth. With a few more embellishments like a "cherry" on top and final wrapping, this can be a modest gift or several could be placed around a shower location as sweet little decorations later to be sent home with the expectant mom.

I was very pleased with this addition to my product line and would have stopped there if I hadn't seen the stack of coffee filters in the pantry. Coffee filters look strangely like giant cupcake wrappers, so I had to keep going and create the Jumbo Cupcake! With this cupcake, I could incorporate even more baby items and larger items for yet another gift. This first one I created included four washcloths and two terry burp cloths. This too will need some mild tweaking in the form of a "cherry" on top and the final packaging. Again, these could be given as a modest gift or several could be placed around a shower as decorations.

I am very excited about these two new items and have since updated the product catalog that I keep (a binder with individual pages for each type of gift with a description, pricing, and pictures to give examples of each item). Now, since I started all this, I need to see if a mini-cupcake is in my future. I'm not too sure since those wrappers are awfully tiny, but you never know!

Monday, May 23, 2011

Candy, Candy, Candy!

Once again, as I was developing new concepts and reworking others, I put together another item that got very little attention since I first made it almost a year ago: Baby Candy. I decided that I would work a bit on the presentation and see if I could improve on what I had done before.

My initial set of baby candy was relatively large. Not too big, just an additional option for this gift/favor/decoration. I included disk candy and rolled candy. I incorporated diapers, washcloths, and teethers wrapped in cellophane for the candy effect. At the time, I was primarily working on concepts for presentation or display and something that would make the photograph appealing. I tried different layouts with a serving bowl and an aluminum tin to see what would work best and how it might be used in practice. I included a photograph in my product catalog binder, but I didn't go much further beyond that and didn't even post a picture on Facebook until recently when I "reinvented" the candy.

This time around, I think I did a better job with the candy. Both the disk and rolled candy were made with washcloths and I think they came out cleaner. I also used tulle to wrap the candy rather than cellophane and I'm not sure which one I like better. This candy was also much smaller than the first candy I made and I decided I would offer a small and large option for the candy. This set included 8 pieces of candy - 4 disks and 4 rolls. When packaging, I'm trying to decide if I want to offer the candy in sets of 6 or 8, but I'm leaning toward 6. With this smaller candy, I have more options when it comes to presentation/packaging and can use a smaller jar or container to package the candy or I can simply offer it in a treat bag.

I'm excited to finally and officially add this item to my product line. Along with the lollipops I've recently made, I'm on my way to offering a larger adorable assortment of other sweets and treats for customers. All I have left to do is work out the details on quantities, pricing, and packaging which won't take long and I feel confident about offering them for sale now.

Wednesday, May 18, 2011

Introducing the Mini Bouquet

Maybe I have a thing with making items smaller, I don't know. I think it's an almost universal truth that women think little things are cute, so maybe that's it. In any case, I had a glass cup that I thought would be great to use for a vase for a baby bouquet on a small scale. So, the other day I decided to put it together and see how it looked.

I gathered half a dozen washcloths and rolled them into "roses". I used a burp cloth for a decorative element in the vase where I typically would have used tissue paper or a similar filling. I like the overall look, but I'm not sure if I would use a burp cloth in practice. If I do, I would probably still add tissue paper or another filling to make it look cleaner.

A cute little bouquet like this could be used as shower decorations where a larger vase would be cumbersome. At a large shower or party with multiple tables, mini bouquets would be great as a smaller centerpiece or several could line a longer refreshment table. I like the idea of small or miniature items being incorporated as shower decorations, especially if you have a larger area where decorations are needed in multiple locations. Another great benefit of these types of decorations is the fact that they are rather affordable if a large quantity is needed.

Friday, May 13, 2011

Go Team!

Some time ago, I decided I wanted to make an Aggie diaper cake - mostly prompted by the fact that I attended Texas A&M University. My oldest received a gift basket full of Aggie items for babies as a gift when he was born and I was excited that there were such baby items and we could start the brain-washing early. Of course, the receipt of such items also got me thinking that they could be incorporated into a diaper cake. My sister-in-law had actually received such a diaper cake when she had one of her girls and after she passed that cake along to me (she didn't use it and had it sitting in her garage for several years), I had even more inspiration to make a cake of my own.

After thinking about it, I decided that my prejudice for Aggie items really could be extended and diaper cakes could be made for any number of teams or schools. Finding appropriate baby items may take a bit of extra time and cost, but once acquired, a diaper cake to support almost any group is possible. My boys had a number of items supporting various teams, so I decided to experiment a bit and use their items to build several sample cakes for demonstration purposes so people could get an idea of what is possible. I made four different items for what I refer to as my "Fan Series."

The first items I made were Cowboys gifts. I put together a two tier diaper cake and a baby basket. The diaper cake was composed of diapers in a spiral style. The tiers were wrapped in custom made decorative burp cloths which were a hand made gift from a friend of mine. The topper for the cake was a fabric toy cube that I made for my little one. White socks and wash cloths were added to finish the cake. The baby basket included many of the same items as the cake. The structure was formed from the custom made decorative burp cloths. The inside of the basket was lined with diapers arranged in a spiral fashion. A Cowboys toy football and wash cloth "flowers" were added to the basket to finish the gift. 

Next, I created a Cubs diaper cake from items that were given to me in a gift package. The collection included a number of items that worked quite well in a diaper cake. This cake was a 3-tier diaper cake built in a spiral style. A Cubs blanket was wrapped around th bottom tier. The middle tier held pre-fold diapers/burp cloths, and the top tier was covered with a Cubs hat. A Cubs onsie, bib, and pair of booties finished the cake. I added crinkle paper to this one for a completed look. It also came in handy to cover the part of the top tier that the hat did not cover completely.

The last (at least for now) item to be included in the Fan Series collection was my long awaited Aggie diaper cake. For this, I used items that were included in the Aggie baby gift basket we received for our oldest child. This cake was a two tier, off-centered cake. I chose this configuration because, for this cake, I included the plush bear that came in the basket. By creating an off-centered cake, the bear could be seated on the lower tier and attached to the upper tier. Unlike most other cakes, this one had a large lower tier and a small upper tier rather than a slowly graduated difference between tiers. The tiers were wrapped in pre-fold diapers/burp cloths. The lower tier held an Aggie onsie. The upper tier held a "Gig 'Em Aggies" beanie hat. A pair of Texas A&M socks topped the cake. As mentioned, the plush bear was seated on the lower tier and situated to hug the top tier. Two Aggie pacifiers and crinkle paper finished the cake.

I'm happy with the way these cakes turned out. They add some more choices for people who are interested in ordering a cake. Options like these were always available, but when people get an opportunity to see it in action, so to speak, it makes the possibility more real and adds an option they may not have known was available. As I mentioned before, these cakes were all sample cakes. The fan items used were all personal items so, those that gave them to us as gifts can rest assured that I'm not building these cakes with the intention of selling them. They were built for pictures to help people see what is possible and get more exposure to the style and look of diaper cakes that I make. The cakes were then broken down and the baby items placed back in their drawers. I look forward to seeing what I can create in the event that a fan cake is ordered in the future.

Sunday, April 17, 2011

New Gift Concept for Easter or Whenever

With Easter only a week away, I was again inspired to create a holiday baby gift. Ok, technically, I made it several weeks ago, but now, you get the inside scoop on my latest creation. Over the past couple of months I've created unique holiday inspired mini diaper cakes that brought to diaper cakes new ideas for themes. This month, I turned to the next major holiday: Easter. While I originally intended to create an Easter inspired diaper cake, I decided to go in a different direction. After all, an Easter basket is much more iconic.

You may be familiar with one basket I made in the past for a friend who was expecting a baby girl. The basket was intended as a centerpiece for her shower and given that the new baby was to be given the name Rose, I felt it was especially appropriate to create a Baby Bouquet for her. This was no ordinary bouquet, however, and I developed a diaper basket to hold the bouquet. (Check out the inside scoop here) The basket was created with ribbon woven into hand-rolled diapers and gave an awesome effect.

So, incorporating this idea to a certain extent and adding in Easter as a theme, I created a new option for baby gifts: the Easter Basket. This basket, similar to the first one I made, was formed of completely usable baby items - no actually basket was included. This basket was started as a spiral diaper cake with diapers creating the base of the basket. A burp cloth was used to wrap and decorate the outside of the basket and a handle was formed with a coordinating burp cloth making the basket cohesive. The basket was then filled with crinkle paper (rather than plastic grass). A stuffed bunny and wash cloth roses were then included to fill the basket with usable baby items and complete the effect.

Of course, the most exciting thing about this gift is that it's not limited to an Easter theme. This basket can be filled with a baby bouquet as it is here, or it can be filled with Baby Candy (baby items rolled and wrapped to resemble candy) or other baby items. The size is also variable, although larger size baskets may require structural adjustments. I'm excited about this newest addition to my product line, although, because of the versatility pricing may be a bit difficult to figure. The most exciting part of this project is that while many of the gifts that I make are available in similar forms from other boutiques and diaper cake producers, I have never seen a basket similar to this one, making it an incredibly unique option for a gift.