Thursday, October 17, 2013

School Spirit!

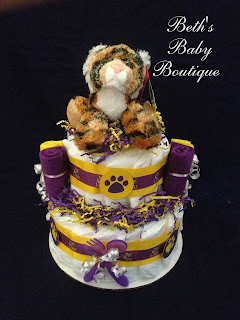
In an attempt to show examples of diaper cakes that were school or team spirit based, I grabbed several items I had for my own kiddos and put together several example cakes and gifts to demonstrate what something of that nature would look like and let my potential customers know it was possible to make a diaper cake that showed loyalty to their favorite school or team. Thus was created my "Fan Series." These example cakes were created more than two years ago - I remember because I was in the middle of working on them when my labor started with my second son. Needless to say, I ended up finishing the project after the baby was born. In any case, that was the last time I created a diaper cake for a specific team, until a couple months ago when I was approached to make an LSU Tigers cake. Now, this hurt me a little since I'm an Aggie, but I had to be a good sport and I was excited about creating another team cake to add to my collection.

The LSU cake was a 2-tier "naked" cake. I found some awesome options for ribbon and finally settled on a purple ribbon with tiger and LSU logos on it. The rest of the cake was adorned with purple and gold items. I'm glad I found a supplier of dark purple washcloths because darker colors are not typical among baby items. To top the diaper cake, I found an adorable plush tiger. I also added several paw print die-cut accents in purple and gold to finish out the cake.

Now, you may notice that one of the differences between this cake and my other Fan Series cakes to date is that the decorations and color scheme created the theme rather than the baby items themselves. One big thing to remember when it comes to baby items (or other items in general) is that licensed or specialty items typically come with added costs. For those on a tighter budget or those that prefer to keep the theme more subtle, incorporating items in the chosen colors and a few theme specific decorative accents can present the theme just as effectively. It really leads to a decent amount of flexibility so a gift can be created for a whole range of budgets and personal preferences.

My customer really liked the cake which is awesome. I'm so happy to have had the opportunity to make a team spirit cake and I look forward to helping more expectant parents celebrate their teams and share their spirit with their new additions - especially if they are Aggies.
.

Wednesday, October 16, 2013

Monkey Cake!

Can I just say, I love monkey themes for babies? I really do. So when a monkey cake was requested, I was more than happy to oblige. I have frequently purchased a set of adorable green blankets with monkeys on them which give a great green and chocolate color scheme for a diaper cake. Add in some super cute monkey baby items and you can't help but have an adorable gift!

For this diaper cake, a 3-tier cake, I started with the stacked tiers. On this cake, I opted to include two blankets for the middle and bottom tier and added some waterproof multi-purpose pads to the top tier that matched the monkey blanket. I also found an adorable monkey beanie hat set that I included and a super cute monkey teether toy. Coordinating washcloths and baby lotion completed the baby items on this cake. Of course, I had to add the adorable plush monkey as a topper for this cake - I really like that monkey. To finish off this cake I added some monkey die-cuts, because obviously, I didn't have enough monkeys on this cake. They were just too cute not to include.

The final cake was adorable. My customer loved it. If I had one complaint, it would be the lighting when I photographed it since it ended up with a bit of a glare on the top. Natural lighting really can cause issues at times! Regardless, the cake was a winner, so I can't really complain too much.

Tuesday, October 15, 2013

Dinos!

The Noah's Ark "diaper cake" led to another order since my friend's co-workers were so impressed by that one. This time, I had the opportunity to create a cake using some blankets that I'd been waiting to use with some adorable dinosaurs on them. I couldn't wait to put it together and add all the details and decorations!

This cake was truly fun and I love the vibrant colors. The order was for a 2-tier covered cake so I began as usual with the stacked tiers and, for this cake, the dinosaur blankets. I added wash cloths, socks, spoons, and other baby goodies to the cake to provide some usable baby items (along with the diapers and blankets).

My favorite part of this diaper cake was the dinosaur die-cut accents. I was fortunate enough to have designs that matched pretty closely to the dinosaurs on the blankets, so I made them in colors to match. It was so exciting to be able to add this kind of detail to the diaper cake. The topper for the cake was also a die-cut dinosaur, but a much larger one. For this I actually placed two of them back to back so there was a finished look from all sides of the cake. Die-cut toppers are a great option as they won't add as much to the final cost of the cake as a plush toy will. This means they are really advantageous for those with a limited budget and they still help to give the cake a finished, polished look.

My customer loved the cake which as I've said before is one of my main goals. I really love how this cake turned out!

Thursday, October 10, 2013

Butterflies and Flowers

Not long after creating my Noah's Ark "diaper cake," another friend of mine contacted me about creating a diaper cake for a friend of hers. She wasn't sure what would work, so I asked for the registry information to see if I could find some inspiration. Fortunately, a lot stood out to me. The expectant mama had registered for a lot of butterfly items and a few thing with flowers. One thing in particular was a butterfly and flower carrier toy set that I decided to use to guide the direction of the cake.

My friend wanted a "naked" cake, so I created the form and began to add items that coordinated with the toy set which was hot pink and pale pink with a little bit of yellow. I created some adorable washcloth butterflies which is something I've done before, but these were smaller and had a different look to them. I also added several washcloth flowers to coordinate as well. I also included some additional items such as socks and teethers. The final decorations included some die-cut flowers.

I really like how this cake included a lot of usable baby items which is a signature thing about my diaper cakes (unless requested otherwise). My friend loved it and so did the mom to be, which is always my main hope.

Friday, October 4, 2013

Unique Diaper Gift for the Mom with Everything

I was contacted by an individual requesting a unique gift for a third time mom. The expectant mom pretty much had everything she needed for a new baby, but my customer was looking for something diaper cake related and small. More importantly, she was looking for something unique. She mentioned that the mom was doing a jungle sort of theme.

This discussion sparked me with some inspiration, so while my potential customer was looking over some various buggies I had available, I grabbed some items I had in stock and put together a unique gift that I had been wanting to try out. I figured I'd offer it to her and if she didn't want it, it was no big deal and I'd be happy to get her the buggy of her choice.

Inspired by some other projects I had seen I wanted to make a jungle tree with a monkey. I used diapers on the base for a portion of the structure and wrapped it up in a brown blanket. Additional diapers and a leaf printed blanket created the canopy for the tree. I added a few washcloth flowers at the base of the tree to give a few additional baby items. The top of the tree also included a washcloth.

I presented the picture to my customer and let her know my final vision included a plush monkey. If she liked this idea, I'd order the monkey and she'd have a truly unique gift.

Well, she absolutely loved the tree and it provided several baby items in a smaller gift than a large diaper cake. I ordered the monkey and added to the tree for the final gift. If we are looking at it realistically, the monkey is a bit big, the trunk a bit wide, but the general idea is there and it's still adorable. I would love the opportunity to create another similar gift in the future. I'd likely make a few tweaks to make the trunk narrower and taller, but otherwise, I think it's a fantastically adorable concept! I love opportunities like this that stretch my creativity!

Totally Adorable, and I Ain't Lion...

Ok, so the post title needs a little work...

After the craziness that went into projects just previous to this one, I was thankful to have a break from the big challenges and make a more "traditional" cake, so to speak. My customer for this cake wanted a lion cake, but wanted it to be simple. The colors were light blue and light orange.

Creating this cake was really fun and though it wasn't as complex as some projects I've done, it wasn't a cakewalk either. See what I did there? Yeah, I really shouldn't try to be funny. Light orange sounds easy enough, but it's not as simple as one would think. There are limitations on the availability of color options when it comes to baby items. There is a little more leeway with decorations, but I've had to get creative in the past. I was very fortunate with this cake to have exactly what I needed - and I used up the last of some items like light orange washcloths which I haven't seen since. I was also able to find some light orange ribbon which helped out greatly. Add some socks and baby utensils that were not quite light orange, but orange nonetheless and I had everything for a completed cake.

For extra accents on this cake I added an adorable plush lion, which, I'll be honest, was maybe a little big for the cake, but it was way too cute to pass up. I really think that this size plush is the biggest that can work for a diaper cake this size. I also added some little lion head accents which were quite adorable.

This cake came together really nicely and my customer loved it. One of the great things about this cake is that the theme was created by one plush animal and decorations. All the other items were basic baby items in particular colors. This makes it a really good option if people are on a budget since a lot of design specific items tend to come with higher costs. The baby items included on the cake are no less usable, and don't conflict with a nursery theme if one has been selected by the mom. Despite this cake being a more clean and less complex cake, it has quickly become one of my favorite creations. I think it's just adorable.

Tuesday, June 11, 2013

Building an Ark

A friend of mine was helping to plan a baby shower at work. He was gracious enough to share my business with his colleagues and they loved my work and were interested in a small diaper gift. They wanted a buggy with a Noah's Ark theme. Easy enough, right? Not so much...

The basic buggy has a blanket, some wash cloths, a burp cloth and may or may not include additional baby items. As popular as Noah's Ark is as far as baby items go, I have never seen receiving blankets or washcloths patterned as such. I decided I'd look for some Noah's Ark printed ribbon I'd seen in the past an maybe add some toy animals to the buggy. Apparently, the ribbon is popular because I checked several stores and online and the few sources that carried it were out if stock. Back to the drawing board.

As I continue to think what I could do, I contemplated adding ark and animal die cuts to a buggy when I was struck with an idea. Why not build an ark? Sure, it sounds crazy, but it had the potential to be really cute. I decided to take the chance and make one. If my friend didn't like it, I could just go back to the buggy idea.

First, I had to get the basic shape which I built up with diapers. It took a couple tries, but with a tan blanket strategically folded around it, the ark was coming together and looking rather boat-like. I added a few details such as a roof and I had ordered some toy animals, in pairs of course, to add to the ark.


The final ark was so adorable and my friend loved it (as did his co-workers). If I make another, there may be some additional tweaks, or added baby items. We'll see. I'm just glad I had the opportunity to try something a little different and see what could develop!

Thursday, May 16, 2013

Two New Projects, a Cake, and a Huge Challenge

Of all the challenges I've had in the past, this one takes the cake. No pun intended. Ok, maybe it was. In any case, I thought that I had received some pretty difficult diaper cake concepts, but since the Geek Chic cake, nothing has stumped me this badly. And the difficulty with this one was not at easily overcome as the geek cake. And that wasn't easy.

When I first spoke with my customer and she described the preferences of the expectant mom, I was very excited. She wanted to stay away from the typical baby themes, booties, and cute animals. She preferred more to stick with a pattern in a particular color scheme. The pattern chosen was the inspiration she used for the baby's nursery: argyle with white, blue, and grey. We looked at several diaper cakes discussing things she liked such as, a large letter at the top for the baby's initial, argyle ribbon, plenty of baby items included on the cake, etc. I was set. All I needed to do was collect the baby items and start construction.

That's easier said than done, I discovered as soon as I began my search for argyle baby items. Argyle items were tough to come by on their own. Finding them in the correct color combination was near impossible. Even finding ribbon to coordinate was difficult. I began to stress about whether or not this was possible. Fortunately, I did have some breaks. I was able to find some ribbon, then some baby items that would work.  I still felt like I was struggling, but I began working on the diaper cake. This cake was a 3-tier "naked" cake. It came together nicely after I managed to collect enough items for the cake. Though, I have to admit, construction of this cake took a lot longer than most, simply because I didn't have all the items all at once and I was in constant brainstorm mode on how to complete the cake and what details I needed to add.

As I neared completion, I still felt the cake needed something else. I came up with an idea to make a pacifier tether. I contemplated a simple ribbon one, but I didn't want it to get lost among the ribbons already on the cake. I decided to hand knot one in an argyle pattern. This worked beautifully, though it was time consuming. I may even make more of these in the future.

After the cake was completed, I added extra details such as decorating the cake board. This was a special request of my customer. She wanted something that made the cake board look better than just the white base they typically have. I was unable to find anything decorative, fancy fabric, baby item, etc. As a way to dress up the cake board, I painted it to match the initial "T" on top of the cake and added grey and white diamonds decorated to resemble an argyle pattern. The cake was finally done.

My customer was also interested in a diaper wreath. I was hesitant to make one at first. I don't like how some styles manipulate the diapers and risks the integrity and possible future use of them (when diapers are opened, the inside is more susceptible to moisture in the air which it absorbs and becomes crunchy). That being said, I wanted to help keep uniformity among the diaper decorations for my customer's shower, so I agreed to create my first one. The wreath was far more difficult than I anticipated, but it came together eventually. I used the rolled style that is often seen as opposed to the style where the diapers wrap around the frame. I added ribbon that coordinated with the diaper cake and a "T" initial that was a smaller version of the one that topped the cake. My customer did request a different pair of shoes than the ones I originally had on the wreath, but otherwise, she was thrilled with it.


I have to say, I am very proud that I have once again met the challenge presented me. All projects turned out beautifully and my customer loved them. I am happy to have another impressive challenge under my belt, and I'm ready for the next one that presents itself.
Wednesday, April 24, 2013

Another Precious "Little Man" Cake

I was surprised and excited yet again when I received another request for a "Little Man" cake recently. Having completed two prior, I was especially excited to show off my work of other cakes done with the same theme. I love being able to say, "I've done something similar, do you like anything about these cakes?" especially if the customer is not quite sure what they want. In this case, my customer had an idea, but after seeing one of the cakes, she liked certain aspects so she decided she wanted that instead.

Custom made mustache bodysuit
This new "Little Man" cake was to be a three tiered cake. My customer liked the blue and green blankets that had been incorporated into the first "Little Man" cake I had done so we had a color scheme as well. I found some awesome mustache ribbon which made me really excited for this cake. I incorporated mustache pacifiers similar to those that I had found for my white, grey, and black "Little Man" cake. I added multiple coordinating baby items as I usually do. Similar to the last "Little Man" cake, I also added mustache, bow tie, and bodysuit accents to decorate the cake as well as scalloped edge badges that read "Little Man." As requested by my customer, a larger badge was added to the front of the cake that also read "Little Man." Once again, I found myself creating a custom item for the cake. This time, it was a bodysuit with a mustache on it.

I love the look of this cake. My customer liked it as well, and from what I hear, so did the expectant mama. I couldn't ask for anything else. As an added note, this cake was shipped further than any cake I'd shipped prior. I'm happy to say it arrived in tact and looked just as great displayed at the shower as it did when I took pictures of it after completion!


Monday, April 22, 2013

More Owls!

I'm noticing that owls are becoming increasingly popular these days, so it's a good thing I had two owl cakes under my belt. I was contacted by a potential customer that was interested in an owl cake. She actually liked the first one I had done and wanted a cake like it.

When I first received the e-mail, I was really excited. I started thinking about the possibilities for this cake. Looking at the cake, the color scheme was developed by the ribbon and the owls. That meant it could technically be made in a variety of color combinations depending on the wishes of my customer. I had already made the washcloth owls in a variety of colors for the two owl cakes I had done previously. The color options for the washcloths (and yarn color options for the owl on top) are slightly more limited than the ribbon, but most color requests should be do-able. I made sure to let my customer know that she had the option of selecting other colors if she needed a different color scheme.

In this particular case, however, my customer wanted the same colors as the original cake, hot pink and lime green. I won't lie, I was a bit disappointed that I wasn't going to be able to try the same cake in a different color, but of course, I was more than happy to create the cake again. I also have to say, I'm quite proud that I had a difficult time telling the difference between the original and "copy" cakes based on the pictures alone. I'm certainly happy that my work is consistent enough that the cake can be what was requested.


Despite not making the cake in a different color combination, I took the idea and this became my fist item that I listed in my Esty shop. To gain access to more customers, I opened an Etsy shop in January, but it wasn't until March 2013 that I opened the shop with this cake as my first item. I offered color of choice for this cake and I'm excited to see how it does. I can't wait for the opportunity to create additional versions of this cake. To view this and other products currently listed in my Etsy shop, please check it out here: http://www.etsy.com/shop/BethsBabyBoutique00

Friday, April 19, 2013

Little Man: Same Theme, Different Cake

When I had done my first Little Man diaper cake, I knew it was getting popular, but I can't say I expected to have another request for it. No, that doesn't make much sense, but, I didn't. I was excited for my new challenge on the theme, however. This new cake was to be white, grey, and black. While one may think this a dull color combination, it was fantastic, and with the use of pattern, I created one truly adorable cake. In addition, I got to pull out my new gadget, a die cut machine, to add some unique accents which you'll start seeing more and more evidence of as I continue to make cakes.

Some of the adorable tuxedo items I found for the cake as
well as some of the mustache cutouts decorating the cake
The cake started as most others as a spiral tiered cake. My customer requested a "naked" cake (one where the diapers are showing rather than covered by blankets) which made the color scheme much easier since the diapers are already white and finding black and grey baby blankets would have been a bit of a challenge. I found some adorable harlequin patterned ribbon in black and white and placed it a top grey and white ribbons. Next came adding the adorable accents. While my previous little man cake primarily gained its theme from the decorations, I was able to add a bit more in the way of baby items with this one. I had found some precious mustache pacifiers to go with the cake. In addition, my customer requested tuxedos along with bow ties, mustaches, and bodysuits to go with this theme so I was able to find some adorable socks and a precious bib with tuxedo patterns on them.

A "Little Man" badge, bodysuit cutout,
and bow tie cut out can be seen here among
the other baby items adorning the cake.
The top of the cake displayed the increasingly popular "mustache on a stick" that I made with my die cut machine. My previous mustache had been a crocheted one, which was adorable, but relatively impractical. This one was purely for decoration, and while it could be used for pictures and whatnot, it could easily be discarded after use or placed in a scrapbook for memory keeping. To finish off the cake, accents were added such as argyle printed "badges" that declared "Little Man,"  as well as bow tie, mustache, and bodysuit cutouts.

The final cake was adorable, and far from boring with the color scheme. The argyle and harlequin patterns as well as the tuxedo prints gave plenty of visual interest to what one might originally think was a relatively monochromatic cake. My customer loved it and I'm so happy to have gotten the opportunity to use my new little toy for adding accents to my diaper cakes. It's an exciting step to making my cakes unique and helping create my own style. With it, I can do an even better job addressing some of the more challenging themes when baby items aren't always available. I can't wait for future opportunities!

Tuesday, March 26, 2013

Owls All Over (Part II)

When I was planning the baby shower for my friend, I really wanted everything to coordinate. Who doesn't, right? That's what pulls a party together. A cohesive look. If you are like me, you want everything to match. Most of the showers I attend, I come as an attendee. A few of them I'm part of the planning, but not many. Most of the time for orders I make diaper cakes to match a theme of a shower. I only hope that the cake coordinates since I don't often see pictures. I've made a few gift sets with diaper cakes that coordinate with other items, bouquets or whatever to go along with a theme, but again, I'm not usually part of any of the decorating. This time was different.

As previously mentioned, my friend loves owls, so I wanted to do an owl themed shower. I made sure that accents and ribbon that were on the diaper cake were seen in other places at the shower. I made decorations that pulled in the same colors and designs that were on the cake.

The individual mobile pieces
The first item I made was what I called a mobile. It was the best descriptor I could come up with. Basically, it was made up of decorated shapes with pictures and images that were hung by string. Accents on the cake had an owl image that matched the shower invitations. The same image was on some of the pieces of the mobile. I used scalloped edges which coordinated with the accents on the diaper cake as well. I also pulled in some other images of owls and onsies with text like "Look Whooo!" and "Little Hoot" on the mobile.

Finished mobile as it hung
Next, I made a banner with the baby's name. It was a standard pennant banner. The letters coordinated with the theme colors and I added extra accents to the ends that matched the mobile.

(Sadly, not my TV.)
The final item I made for the shower was cupcake toppers. These toppers were made in the same design as the accents on the diaper cake with the owl image and scalloped edged background. They were double sided so they looked cute from every angle.

Cupcake toppers in various
color combinations
Scalloped edge owl accent
on the diaper cake
In addition to the decorations I made, we added even more accents to coordinate with the overall theme. We had orange flowers displayed in multiple vases around the shower area. We wrapped some of the owl ribbon from the diaper cake around the vases. We also had orange, brown, and turquoise balloons displayed. And because I can't help but go over the top, I made an owl out of a pineapple and some other fruits and made owl chocolate molds.

It was exciting to see how so many decorations could pull the theme together and I loved being able to create so many items that could coordinate with the diaper cake so well. I'm considering offering some of the shower decorations as options for diaper cake customers. It would certainly help to make shower prep easier and really ensure the overall theme is tied together. I'd love feedback on this idea! Please let me know either in the comment section of on my Facebook page!

Tuesday, March 19, 2013

Owls All Over (Part I)

If you've read my recent posts, you saw that I made an adorable owl cake for a friend and customer with some super cute owls made of completely usable washcloths. You probably also noted that I mentioned I was using that cake as practice for a shower I was throwing for a close friend of mine who loves owls. This diaper cake was epic. I have to say that it's one of my favorites (but I also have to be honest that most of my cakes become favorites) and I think I really achieved something I've never seen before in the diaper cake world: a cloth diaper diaper cake that rivals traditional diaper cakes. This cake left nothing to be desired when it comes to diaper cakes. I'm certainly proud to have it in my gallery of works.

My friend had registered for prefold diapers (these are the ones most people think of when they hear about cloth diapering and they are more often than not used as burp cloths these days) so that is what I used to form the cake. With careful folding, the diapers were formed into spiraled tiers that have become my standard style for diaper cakes. After the cake was built, I commenced with decorating. I had chosen turquoise, orange, and brown for the shower colors. Using those colors and some owl print and striped ribbons, I decorated the cake. The cake was also adorned with the washcloth owls in coordinating colors. A few pairs of socks and a handmade crocheted plush owl were added as accents. One more detail added to the cake was several owl "badges" that coordinated with the shower invitation and other decorations for the shower. A few more decorative additions and the cake was finished.


This cake thrilled me to no end. It looked so far gone from the other cloth diaper diaper cakes I had made for practice, and in my opinion, blew them out of the water. At first glance, it's almost difficult to tell that this cake was made with cloth diapers instead of disposable. It certainly proves that just because a mom chooses to cloth diaper, she doesn't have to miss out on a diaper cake at her shower. My friend adored the cake, but I'll be honest, I didn't really have any doubts.


 Please check back for the follow-up post that will show you all the shower decorations and accents that coordinated with this cake! I'm hoping to make various decorations available on future orders so customers can have a truly cohesive shower.

Tuesday, March 12, 2013

Monkey Trike!

You would not believe how excited I was to get my first order for a trike. I had made a few prior to this request and I was armed and ready with new ideas and techniques. What can I say, after making a few, there was definite room for improvement and that's exactly what I intended to do, improve.

The request for this trike was for a monkey theme which worked out wonderfully since monkeys are very popular on baby items and once we decided on the color green, I knew just which blankets to order for this trike. I built this one up slightly different than the ones I had done in the past. This one had the back wheels positioned outside of the front wheel rather than just behind. This gave the trike more stability and made it look more like a trike in pictures. I used several baby items to build it up including blankets, washcloths, a burp cloth, and bottle; and of course, the monkey driver. Finished off with ribbons, this gift was done.

I am so proud of how this one turned out and I learned some new tricks along the way. These trikes are so fun to make and I can't wait for another opportunity. My customer loved it, of course, and I now have one more awesome gift to brag about.

Monday, March 11, 2013

Little Man

It seems that "Little Man" is becoming quite the popular theme. I've made two cakes within the past 4 months with that theme and I'm in talks for a possible third. My first Little Man request came in December. The colors selected were green and blue and my customer wanted to incorporate mustaches, bodysuits, and bow ties.

I had difficulty finding appropriate baby items for the cake that would match the theme that were also at a reasonable price, so I relied heavily on decorations to set the stage, so to speak. I made the 2-tier cake as requested and covered the tiers in blankets to match the colors selected. I added baby items to match the colors as well. For the topper, I wanted to do a mustache on a stick. For that, I created a plush crocheted mustache and attached it to the top of the cake on a tall dowel. Mustache, bow tie, and bodysuit printed accents were added, also in coordinating colors.

The cake was adorable and achieved the look I was going for. It went over great with my customer. This cake is a great example about how any theme is possible. I like to pull from the blankets I use, the baby items, and/or the decorations to create the theme I'm going for. Sometimes, baby items are available, sometimes, they are not, but that doesn't mean that you are restricted from getting what you want.

Saturday, March 2, 2013

Owl Tell You All About It

This cake was a hoot! Ok, maybe not a hoot, but I had to get in the owl jokes somehow. This cake was extremely fun though. If you haven't guessed, my next requested cake was an owl cake. I was thrilled beyond belief for two reasons. First, I loved the challenge. Owls are crazy popular these days and it's fun to jump right in there and see what I can do. Second, a close friend of mine was expecting a baby and I was hoping to do an owl theme for her shower, so this let me try things out a bit as a sort of practice cake to see what I could come up with that might be incorporated in my friends diaper cake as well.

Final owl concept with ear tufts and belly patch
Early owl concept, no ear tufts
I was determined to find something that would work for this cake, but I had one big snag. The color scheme was hot pink and lime. While owls aren't terribly difficult to find in baby items, finding them in those colors proved to be a bit tricky. I had to pull out all the stops and see how I could get this done. Fortunately, because I had  obtained hot pink wash cloths for my "About to Pop" cake, I knew I could incorporate those. What I wanted to do was make some washcloth owls, but had no idea how. Fortunately, after playing around a bit and trying to find instructions (which didn't exist, except for a paid pattern) I came up with my own design for creating some adorable little owls. It seemed the more the I worked on them, the cuter they got. The best part of all is that they are completely usable after they are disassembled. I was so excited to find another washcloth creation that could be added to a diaper cake, facilitate a theme, and provide a new mom with a usable baby item. Multi-tasking decorations. As if all of that wasn't enough, these owls can be made out of washcloths of any color meaning that there is more variety in color schemes for the same basic decoration. The creation of these little owls inspired me to create a new album on Facebook that highlighted the different things I can make with washcloths. These little "washcloth creations" can be used as extra accents and decorations on diaper cakes or other gifts and some can even be stand-alone gifts. Its wonderful!

With the owls made, my cake was pretty much done. This cake was a "naked" cake, so with the diapers stacked, ribbon secured, and the owls applied, only a few more accents were needed. I added some socks and no-scratch mittens to the middle tier as the owls were placed on the top and bottom tiers. To finish off the cake, I made a crocheted plush owl in the chosen colors and used it to adorn the top of the cake. This owl could be an adorable keepsake from the shower or be given to the baby as a play toy. Some paper shred finished off this cake.

I was beyond thrilled with the outcome of this cake. It definitely added to my repertoire, adding variety and more customization that could be done to future cakes. It also gave me a launch point for ideas for my friend's cake. Of course, my customer loved the outcome which is better than me being happy about it. I look forward to more owl cakes and more opportunities to test my creativity.

Monday, February 25, 2013

Two Peas in a Pod - My First Twin Cake!

It just so happened that right in the middle of all my preparations for the craft fair I attend every year, I had an order for a diaper cake. And not just any diaper cake, a twin cake. I was thrilled with the opportunity, but a little stressed since I needed to make it along with all the cakes I was working on for the craft fair. That'll teach me to procrastinate on craft fair prep. Regardless, I was overjoyed with the concept of this cake - Two Peas in a Pod.

My first thought was to create tiny pea pods out of washcloths. I had no clue how to go about doing it, but I figured it out and they came out adorable. My customer loved them! And, not only could I add them to this cake, but I also have that accent in my back pocket should another pea pod cake be requested!

I continued on with the rest of the cake, a green and yellow cake, with blankets wrapping each tier. Because the budget for the cake was a little tight, I wasn't able to get a large plush topper (or two) that are commonly seen on top of cakes so I was struggling to come up with a cake topper and just about had decided to add just the paper shred. Fortunately, inspiration hit and I came up with an idea to create a giant two pea pod for the top of the cake. As one additional decoration for this cake, I added some "Two Peas in a Pod" decals to accent the cake. I also added lettering along the bottom tier that read, "Peas in a Pod."


I loved this cake. My customer was thrilled that I was able to add a topper for the cake and keep within the budget. I finished the cake just in time to deliver it on my way to Dallas for the craft fair, so it worked out great, even with my minor time crunch. This truly was an exciting project for me.

Craft Fair 2012

2012 marked the third year I'd attended this annual craft fair with my mom and brought along my diaper cakes and baby gifts. In the years before, I brought the jewelry and accessories I made. I still bring them, but I try to focus more on my diaper cake items since they seem more popular an I enjoy making them more as well. I was ready with more inventory than I'd had in the past and was ready to go.

As it turned out, I didn't quite have the space for everything I brought with me. I tried to make do with what I had. Larger items were placed on display and smaller items filled in the small amounts left on the table. A few items just couldn't get placed out and I figured they would just come out and full empty space as items sold.

I was optimistic. Too optimistic, it seemed. I actually sold more of my other items than I did my baby gifts. My sister did purchase a buggy, but aside from that I returned with most of the inventory I arrived with. I was disappointed, but this is par for the course, so to speak. Diaper cakes do not sell well at craft fairs and it's not just mine. I had intended to make more small items in hopes of them selling better than the larger items, but I did not have room for everything and maybe I should have held back on the diaper cakes on the table. Live and learn. Perhaps next year I will try to bring some mini cakes and leave the larger ones at home. We will see.


I still enjoyed the time with my mom and sister and that's the real reason I go to this show anyway. Not that I wouldn't welcome more sales, of course.

Wednesday, January 16, 2013

Craft Fair 2012 Prep (Part 2)

As November and the annual craft fair drew closer, I still had a lot of work to do. I had most of the larger cakes I wanted to have available for the show, but I still needed a 2-tier boy cake and some buggies to replace ones I had sold. I also wanted to try some single tier cakes.

The two tier boy cake was one I was really excited about. I had some adorable sporty blankets in stock and I was thrilled to be able to use them. I used the colors red and blue as accents and created a super cute 2-tier cake complete with little baseball shoes on top. I also found some bath squirters that were shaped like sports balls and couldn't pass them up. Add some sporty accents and ribbons and I had a truly adorable cake for anyone's "Little Sport."

My next project was buggies. I had a gender neutral buggy on hand, but was in need of a blue one and a pink one. These are great little gifts and very popular because they contain a lot of baby items in a small package. I used some single blankets I had for these and used solid wash cloths to pair with patterned blankets. I have slightly changed the way that I make the structure of the buggies so they are easier for the expectant mama to use, but the changes are only internal and the exterior of the gift looks just as adorable as always.

After the buggies were done, I was happy to find that I still had some time to create some 1-tier cakes for the craft fair. For these, I was able to use some extra diapers that I had trouble putting in other cakes (because I don't typically mix brands - but will if requested). I made three 1-tier cakes, boy, girl, and gender neutral. These cakes were single layer with 10-15 diapers, a blanket, and several baby items added to them. They were each topped with paper shred for a complete simple gift. They really rounded out my offerings for the craft fair.


With the cakes finished (and finishing a rush order I had in the middle of this - keep an eye out for that blog), I had just enough time to put together a cake for donation. The craft fair always sponsored a raffle where they asked vendors to donate an item to the raffle. For this cake, I made up a 2-tier gender neutral mini cake that was green and yellow and contained many baby items. It was a great gift on it's own and a mini version of what you'd expect on larger cakes that I make.

I was finally done with all my items for the craft fair. It took a lot of time and creative scheduling to make it all in the time I had allotted. I hope for the 2013 show, I'm better prepared and don't quite have the time crunch. I'm happy with how these cakes came out and I'm happy for the opportunity to create more cakes to show what I can do.